Which Screen Media Survives Wet Coal Screening?
Nov 2, 2026
 admin
What is custom-cut polyurethane skirting? It is a polyurethane sealing strip manufactured to the measured geometry of one specific conveyor transfer point rather than to a nominal stock width. The strip is cut to belt width, bevelled to the actual trough angle, squared to the skirtboard run and drilled to the clamp bar pitch, so the bottom edge follows the belt across its full width instead of touching only at the centre idler.
✔ A bevelled cut matched to the trough angle is the difference between a seal and a leak on any troughed conveyor.
✔ Trough angle must be measured at the idler set, not read from a drawing, because retrofitted idler sets frequently change it.
✔ The target gap is contact at the centre and both wing transitions, with 2 mm to 3 mm of clearance elsewhere, set with the belt running.
✔ Custom cutting adds one to three weeks to lead time and cannot compensate for a worn or misaligned belt.
✔ Polyurethane holds a machined edge better than rubber, but rubber tolerates a rough belt and poor alignment better.
✔ Ten to fifteen millimetres of take-up below the clamp bar turns a replacement into an adjustment.
| Item | Description |
|---|---|
| Function | Seals the gap between the skirtboard and the belt at loading and transfer points |
| Material | Polyurethane, 80–95 Shore A, sometimes hybrid with rubber |
| Thickness | 10–30 mm; 15–20 mm typical for medium-duty transfer points |
| Cut profile | Straight, bevelled to trough angle, or fabricated with mitred corner joints |
| Application | Troughed belt conveyors handling coal, iron ore, copper ore, aggregates, tailings |
| Service Life | 6–18 months in abrasive duty, depending on gap setting and belt speed |
| Benefits | Spillage control, reduced belt cover wear, fewer unplanned stops, predictable wear allowance |
Spillage at a transfer point is rarely a belt problem. It is almost always a gap problem. Material escapes through the space between the bottom of the skirtboard and the top of the belt, or around the ends where the strip stops short of the chute wall. The fix looks trivial, which is exactly why it gets botched: someone orders a roll of 150 mm strip, cuts it with a handsaw and bolts it on. Two weeks later the belt runs off-centre on one side and there is a pile of fines under the head pulley.
Custom cutting exists because a conveyor has a geometry, and that geometry varies. Belt width, trough angle, idler spacing, skirtboard height, clamp bar type and the material being carried all interact. Off-the-shelf strip is made to nominal dimensions and will only fit by coincidence.
Three levels of customisation exist, and they are not interchangeable.
Cut to length and width solves length and nothing else. Strip is cut to the skirtboard run and the required exposed height, then squared.
Bevel cut to trough angle is where most of the value sits. A 35-degree belt does not present a flat surface to the skirtboard, so the bottom edge must be cut with a matching bevel to follow the belt profile across its full width. This is why Conveyor Belt Skirting is specified by hardness and cut tolerance together, not by material name alone.
Fabricated assemblies are used where the chute plan converges or diverges. Individual pieces are mitred and joined, usually by vulcanised splicing or mechanical fastening, to form a continuous seal around the loading zone.
It helps to place the part correctly before specifying it. Skirting is one component in a containment chain that begins at the chute and ends at the belt cleaner, and the Conveyor section of this site maps the neighbouring components.
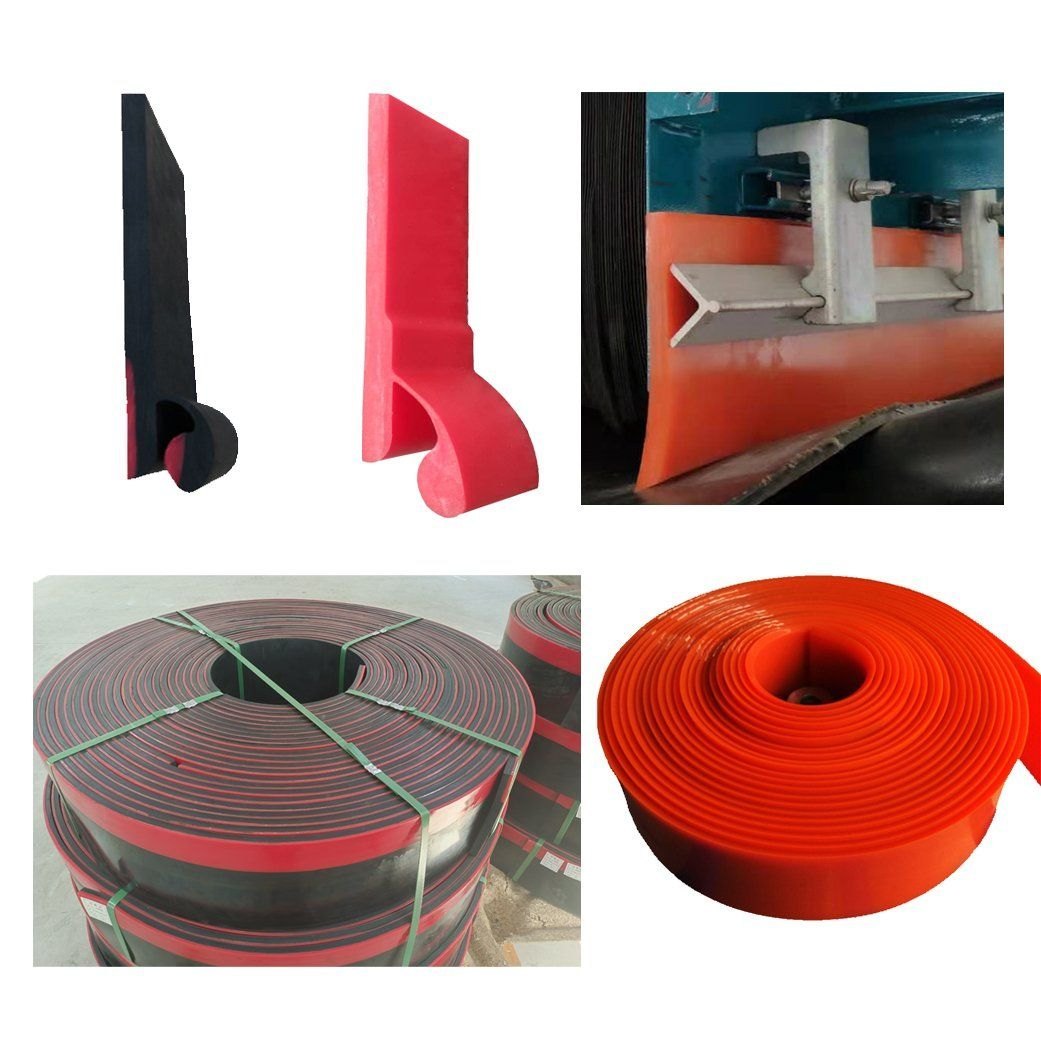
Polyurethane skirting profiles, installed skirt line and coiled strip ready for cutting
Polyurethane skirting in three forms: extruded profiles, an installed skirt line under a clamp bar, and coiled strip ready for cutting.
The seal is created by proximity, not by pressure. Polyurethane is stiff enough to hold a machined edge and flexible enough to deflect slightly under a loaded belt. When the skirt sits within a couple of millimetres of the belt surface, the belt sags between idlers under load and closes that clearance at the points that matter.
This produces a real trade-off. Press the skirt hard against the belt and the seal is excellent on day one, at the cost of friction, heat and cover wear. Leave a visible gap and the belt runs free, at the cost of spillage.
Three cutting decisions determine how well the compromise works:
Bevel accuracy. A bevel two degrees out across a 1200 mm belt leaves one wing floating. The seal is only as good as its worst point.
End treatment. Square-cut ends that butt against a contoured chute wall leave a vertical gap. Ends should follow the chute contour, or the corner should be filled with a separate piece.
Edge finish. A rough cut on polyurethane leaves a ragged lower edge that picks up fines and wears unevenly. A machined or waterjet edge stays straight and seals consistently.
Belt construction matters to all three. A stiff, thick Conveyor Belts assembly deflects less between idlers, so the skirt can be set closer without risk of contact under load. A thin, flexible belt deflects more and needs a little more clearance to avoid rubbing.
| Property | Polyurethane | Rubber | Composite / Hybrid |
|---|---|---|---|
| Abrasion resistance | High | Moderate | High at the wear face |
| Cut edge stability | Holds a machined bevel | Deforms, tolerates a rough cut | Depends on the facing material |
| Conformity to imperfect belt | Moderate | High | Moderate |
| Compression set under clamp bar | Low | Higher | Low |
| Temperature range | Good to about 80 °C continuous | Broader, softer at high temperature | Depends on compound |
| Best duty | Dry, abrasive, high tonnage | Old conveyors, rough splices, misalignment | High impact plus abrasion |
| Relative cost per metre | Higher | Lower | Highest |
| Procurement risk | Needs accurate dimensions | Tolerates field trimming | Needs a precise bonding specification |
Polyurethane is harder and more dimensionally stable than rubber. It holds a machined bevel cleanly and does not creep under the clamp bar, which is why it dominates dry abrasive duty. Rubber is softer, compresses more readily and tolerates both a rougher cut and a less accurate belt, which is why it still wins on older conveyors.
The same trade-off appears across the screening side of the plant, where the choice between Polyurethane & Rubber Screen Panels follows very similar logic: polyurethane for abrasion resistance and edge stability, rubber for impact and conformity.
| Situation | Recommended Cut | Reason |
|---|---|---|
| Standard 35° trough, straight run, sound belt | Cut to length, bevelled | Lowest cost that still seals properly |
| Trough above 35°, or a deep U-profile | Bevelled and checked against the idler profile | A straight cut leaves wedge gaps on both wings |
| Tapering or converging chute plan | Fabricated with mitred corners | A single straight piece cannot follow the plan |
| Mechanical splice with raised fasteners | Bevelled with local relief at the splice | Otherwise the splice chews the skirt through in weeks |
| Belt line speed above 3.5 m/s | Shorter exposed height, tighter tolerance | Less residence time for material to become trapped |
| Badly worn, cambered or badly tracked belt | Rubber or hybrid, tracking corrected first | A hard edge will wear the cover unevenly |
| High impact at the loading point | Thicker section plus an impact bed | Deflection has to be controlled before sealing can work |
The last row deserves emphasis. Where impact energy is high, the belt deflects sharply at the loading point and no skirt cut can hold a seal against that movement. Controlling deflection with an Impact Bed is a precondition for sealing, not an alternative to it.
| Industry | Material Handled | Typical Issue | Skirt Specification |
|---|---|---|---|
| Coal mining | Coal, fines, damp | Dust escape at bunker discharge | 15–20 mm PU, 85 Shore A, bevelled |
| Iron ore | Hematite or magnetite, lump and fines | Edge wear at chute ends | 20–25 mm PU, 90 Shore A, fabricated corners |
| Copper ore | Wet, sticky ore | Bridging and carryback | 15–20 mm PU, relief at splice |
| Gold and lithium | Fine concentrate | Loss of value in fines | Tight tolerance, 85 Shore A |
| Aggregates | Crushed stone, sand | Spillage on tapering chutes | Fabricated with mitred joints |
| Tailings | Slurry-adjacent solids | Wet material tracking along the belt | Hybrid or rubber, plus secondary cleaner |
| Fertiliser and phosphate | Granular, mildly corrosive | Buildup on the skirt face | Smooth-faced PU, 85 Shore A |
Spillage control at the source. Material that stays inside the skirt line never becomes a cleanup task, a dust source or a housekeeping cost. This is usually the fastest payback, and it is measurable in labour hours per shift.
Longer belt life. A well-fitted skirt reduces the volume of material dragged under the edge, which is the main cause of cover gouging. Localised wear grooves from a badly fitted skirt eventually force a belt replacement, and a belt costs far more than the skirting that should have protected it.
Fewer unplanned stops. Spillage under a transfer point escalates into idler seizure and belt misalignment. Both are unscheduled events, and both are usually attributed to the belt rather than to the seal.
Predictable wear allowance. A correctly cut part has enough exposed height below the clamp bar to be dropped 10 mm to 15 mm as it wears, which converts a replacement into an adjustment and removes a shutdown from the plan.
Custom-cut skirting is specified wherever a belt is loaded or transferred and the geometry is not standard. On Belt Conveyors being upgraded rather than repaired, the loading zone is best reviewed as a whole: chute, guide trough, impact bed, idlers and skirt together.
Process context matters more than most procurement documents admit. In a typical hard-rock flow, crushing produces a lumpy, sharp feed that is screened and then conveyed to grinding. The conveyor between screening and the mill stockpile carries a mix of sizes with a high proportion of near-size material, and near-size material is what finds gaps. Downstream, dewatering and filtration produce a wetter product that behaves differently again, bridging across small openings instead of flowing through them. A skirt specified for dry crushed ore will underperform on a filter cake discharge unless the moisture is stated at enquiry stage.
Where the chute plan tapers, sizing the Guide Trough at the same time avoids cutting a skirt to a geometry that is about to change.
Selection follows five decisions, in order, and skipping any one of them is how custom parts end up on a shelf.
1. Establish the trough geometry. Measure the angle at the idler set. Twenty, 35 and 45 degrees behave differently, and retrofitted idler sets often differ from the original drawing.
2. Set the exposed height. The distance from clamp bar underside to belt surface controls flexibility and sealing force. Too much height and the strip folds under load; too little and there is nothing left to take up as it wears.
3. Choose hardness against duty. 80–85 Shore A suits general service and belts that are not perfectly straight. 90–95 Shore A wears longer but demands an accurate gap and a true belt line.
4. Choose thickness against impact. Thicker sections resist impact and last longer, but are less flexible and less suitable on small-diameter pulleys.
5. Decide the joint method. Vulcanised joints are stronger and smoother; mechanical joints are faster to fit and easier to replace in the field.
Idler condition belongs in step one. Worn or mismatched Conveyor Idlers & Rollers change the belt line, and a skirt cut to the drawing will not seal against a belt that is no longer where the drawing assumes.
A quotation request should read like a small engineering document, not a phone call.
| Required Information | Why It Matters |
|---|---|
| Belt width, measured as face width not pulley width | Sets the overall skirting length across the trough |
| Trough angle, measured at the idler set | Determines the bevel along both wings |
| Skirtboard run length, both sides | Total linear metres and where joints will fall |
| Exposed skirt height | Controls flexibility and sealing force |
| Clamp bar profile and bolt pitch | Fixes hole positions and compression |
| Belt line speed at normal operating rate | Fast belts need shorter skirt and tighter sealing |
| Material: lump size, moisture, abrasiveness, temperature | Drives hardness and thickness selection |
| Belt construction: plies, cover thickness, splice type | Sets how much skirt pressure the belt tolerates |
| Dimensioned sketch or drawing | The cut profile must be approved before material is released |
Supplier evaluation checklist. Can the supplier manufacture to drawing and return a dimensioned sketch for approval? Can they provide a material report stating hardness, tensile strength and tear resistance rather than implying them? Do they support OEM replacement against existing part numbers? Do they have export packing and shipping experience for long flexible sections? Can they give a wear-life recommendation for your specific duty rather than a generic figure?
Commercial points. Expect one to three weeks from confirmed drawing to shipment for custom work, and longer where fabricated corners or non-standard compounds are involved. Confirm the tolerance in writing — a sensible figure is around 2 mm on length and bevel. Agree the joint method. Check lead time against your shutdown window, because a missed window costs more than the part. Packaging matters on long sections: coiled or crated to prevent kinking, with the cut profile protected in transit.
For high-impact loading zones, the Heavy-Duty Conveyor Impact Bed is normally specified in the same enquiry, because impact deflection and skirt sealing are the same engineering problem approached from two directions.
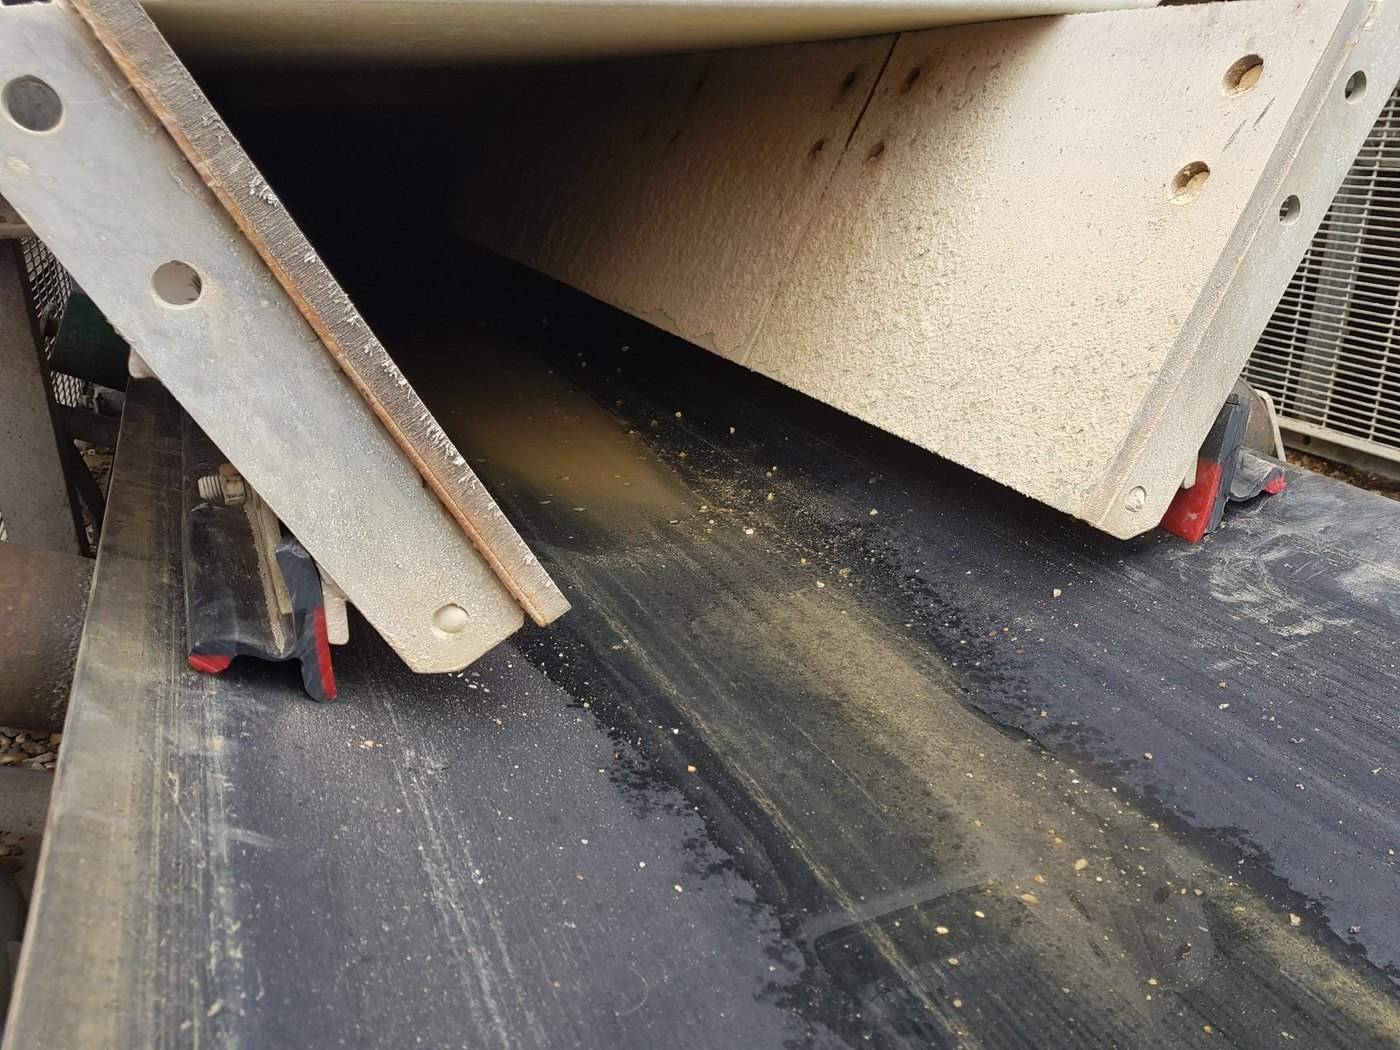
Material escaping along the skirt line at a conveyor transfer point
Material escaping along the skirt line. Spillage concentrated on one side points to a bevel or alignment problem rather than a worn skirt.
| Problem | Possible Cause | Recommended Solution |
|---|---|---|
| Spillage under the chute on one side | Bevel does not match the trough angle | Re-cut or re-bevel; check the idler set for damage |
| Spillage along the full length | Skirt set too high, or clamp bar loose | Lower the skirt; re-torque the clamp bar evenly |
| Belt edge wear, one side only | Skirt bearing hard on one wing, or belt misaligned | Reset the gap; correct tracking and load centring |
| Skirt worn through in weeks | Material trapped between skirt and belt, or a mechanical splice | Lift the skirt at the splice; review containment upstream |
| Skirt splitting at the bolt holes | Over-torqued clamp bar, or wrong hole pitch | Re-drill to correct pitch; apply the specified torque |
| Cracking along the bevel | Bevel cut too sharp, or material too hard for the belt | Increase the bevel radius; review hardness selection |
| Skirt lifting at the ends | Square-cut ends butting a contoured chute wall | Cut ends to the chute contour, or fill the corner separately |
| Uneven wear across the width | Belt misalignment, or a damaged idler set | Correct tracking and replace damaged idlers before re-cutting |
Two of these deserve a note. Wear through in weeks is almost always a splice problem: a mechanical splice with raised fasteners acts as a scraper and will destroy skirting that is otherwise correctly specified. Uneven wear across the width is a tracking problem wearing the appearance of a material problem, and replacing the skirt without correcting tracking reproduces it.
Daily inspection. Check the skirt line at shift start. Look for a jet of fines, a plume of dust, or material building up on the floor beneath the chute. A torch along the skirt line from the walkway is enough.
Weekly inspection. Check clamp bar torque along the full run. Uneven torque is the most common cause of a skirt that seals at one end and leaks at the other, and it is a two-minute check that prevents a two-day cleanup.
Monthly inspection. Measure the exposed height at three points — centre and both wings — and record the numbers. The wear trend, not the wear value, tells you when to drop the strip. A uniform loss of 3 mm a month is a plan; a loss of 8 mm on one wing is a bevel problem.
After any belt work. Re-check the skirt line. A skirt that is too tight on one side will steer the belt before it visibly leaks, which makes the Belt Tracker the early warning instrument rather than a separate concern.
Carryback control. Material adhering to the return strand builds up on idlers and pulls the belt off-line, and that misalignment can destroy a well-fitted skirt within weeks. The Conveyor Belt Cleaner / Scraper on the head pulley prevents the sequence at its origin.
Spares and replacement timing. Hold one spare cut section per transfer point, or at minimum the strip for the highest-wear position. Custom parts are not available off a shelf, and a two-week lead time on a leaking transfer point is an expensive wait. Replace rather than adjust when the exposed height approaches the minimum that will still seat under the clamp bar.
Customer type: Iron ore handling plant, northern China.
Ore type: Hematite, lump plus fines, moisture 4–6%.
Operating conditions: 1200 mm troughed belt at nominal 35 degrees, 3.2 m/s, two-shift operation, ambient temperature down to −15 °C in winter.
Problem: Spillage concentrated on the right-hand wing of a transfer point. Straight-cut 150 mm strip had been fitted three times, each time sealing at the centre and leaking at the wing. Belt edge wear was visible on the same side, and cleanup occupied roughly an hour per shift.
Solution: The trough angle was re-measured at the idler set and found to be closer to 40 degrees than the 35 degrees shown on the drawing, because the idler set had been replaced without updating the drawing. The strip was re-cut with a matching bevel, the hole pitch corrected to the clamp bar, exposed height set to 22 mm with 12 mm of take-up, and the gap set with the belt running loaded.
Result: Spillage at that point stopped, and the cleanup routine was reduced from about an hour per shift to a visual check. Belt edge wear on the affected side was no longer measurable over the following six months. The improvement came from correcting a measurement, not from changing the material grade — which is the usual finding in this kind of investigation.
Can polyurethane skirting be cut to any belt width?
Yes, within practical limits. Length is cut to order, so belt width is not itself a constraint. What changes is the number of pieces: belts wider than about 1800 mm are normally supplied as two or three sections joined on site, because handling and shipping one continuous strip becomes impractical.
How much gap should be left between skirting and the belt?
The target is contact or near-contact at the centre and at both wing transitions, with no more than 2 mm to 3 mm of clearance elsewhere. Set it with the belt running. A larger gap leaks, while a hard pre-load wears the belt cover and adds friction load to the drive.
Is polyurethane better than rubber for skirting?
It depends on the duty. Polyurethane resists abrasion better and holds its cut edge, which suits dry, abrasive, high-tonnage service. Rubber conforms better to an imperfect belt and tolerates misalignment, which suits older conveyors and rough splices. Neither is universally better.
What is the most common cause of a custom-cut skirt leaking?
A bevel that does not match the actual trough angle, usually because the angle was taken from a drawing rather than measured at the idler set. The second most common cause is uneven clamp bar torque along the run.
How long does custom-cut skirting take to supply?
Typically one to three weeks from confirmed drawing to shipment, depending on compound availability and whether fabricated corners are involved. Standard strip ships faster but rarely fits a tapering chute without field modification.
Can I install custom skirting without shutting down the conveyor?
Not safely. The gap has to be set with the belt running, but access to the clamp bar requires the conveyor stopped and locked out. Most sites plan two to four hours per transfer point into a maintenance window rather than attempting it live.
How do I know when to replace rather than adjust?
When the exposed height approaches the minimum that will still seat under the clamp bar, or when the bottom edge has worn unevenly across the width. Uneven wear usually indicates a bevel or alignment problem that will repeat on the replacement unless it is corrected first.
Does the skirt line affect dust suppression performance?
Yes, directly. A closed skirt line is the first containment stage, and anything that escapes it has to be compensated for downstream. Where dust is the primary concern, the Spray System should be designed around a sealed loading zone rather than an open one.
Can skirting be supplied together with the clamp bar?
Yes, and on new installations it usually should be, because the clamp bar profile determines the strip thickness and hole pitch. Supplying only the strip to fit an existing non-standard bar is where fitment problems begin.
What documentation should come with a shipment?
A dimensioned cut drawing matching the delivered part, a material report covering hardness and mechanical properties, and packing details. On repeat orders, that drawing becomes the reference that prevents specification drift.
Custom cutting is the default answer for polyurethane skirting, not an optional extra. Three measurements decide whether the part works: the actual trough angle at the idler set, the exposed height below the clamp bar, and the clamp bar hole pitch in service. Get those right, insist on a cut drawing before material is released, set the gap with the belt running, and leave take-up for wear. The transfer point then stops being a shift-by-shift cleanup job.
A well-fitted skirt still cannot survive a belt being pulled off-line by carryback. On conveyors that keep losing their seal, the Mining Secondary Belt Cleaner where primary cleaning leaves a film is usually the missing piece.
Related Products
Related Technical Guides
Related Buyer Guides
Related Comparison Articles
Annie Lu
Email: annie.lu@huataogroup.com
WhatsApp/WeChat: +86 18032422676
Website: www.tufflexscreen.com
Send the transfer point dimensions and the clamp bar profile, and we will confirm the cut specification and quote against a dimensioned drawing.
admin